Types of Bike Brakes
In this guide to different types of bike brakes, you’ll learn what each brake type looks like and how each kind works. There are many bike brake types including coaster, drum, rim, hydraulic, cantilever, caliper, V-brakes, and many others.
But in this post, I’ll describe 4 of the most common types. But before we dive into the four main kinds, know that most bicycle brakes can be categorized as drum, rim, or disc brakes.
3 Broad Categories of Bicycle Brakes
- Drum brakes
- Rim brakes
- Disc brakes
There are different kinds of brakes under each of these categories, and each is somewhat different than the others. When you put all of these options together, you get a nice little list of 15 bicycle braking options.
List of 15 Different Types of Bike Brakes
- Rod brakes
- Caliper brakes
- Side-pull caliper brakes
- Center-pull caliper brakes
- Direct-mount calipers
- Cantilever brakes
- U-brakes
- V-brakes
- Delta brakes
- Roller cam brakes
- Hydraulic rim brakes
- Mechanical disc brakes
- Hydraulic disc brakes
- Coaster brakes
- drum brakes
That’s too many brake types already! I don’t want to overwhelm you with information. So, I’ll focus on the most common brake types.
4 Common Bicycle Brake Types
These include:
- Caliper brakes: regular vs. direct-mount brakes
- Cantilever brakes
- V-brakes
- Disc brakes: hydraulic vs. mechanical disc brakes
Let’s now examine each of these 4 brake types.
1. Cantilever Bicycle Brakes (Mostly Found on Cyclocross Bikes)
If there’s one thing that cantilever bike brakes do really well, it’s providing lots of clearance. This ample clearance lets you fit in relatively wide tires and fenders. Also, mud has a harder time sticking around in this gap so you can have an easier ride in tough conditions.

These brakes are simple, clean, and light. And in terms of braking power, few brake options can touch cantilevers. The reason cantilevers are the brake of choice on tandem bikes is their amazing braking capabilities. They’re also used on touring bikes.
One reason cyclocross riders love cantilever brakes is because of them having lots of clearance. Another reason is that they’re almost as good as V-brakes performance-wise.
But even though this stopping mechanism offers good performance and mud clearance, some cyclocross riders these days are gravitating toward disc brakes.
To get the most out of cantilever brakes, you need to handle setup right. One thing you should pay particular attention to is the angle of the straddle cable.
Like V brakes, cantilevers use cartridge-style pads. That means they’re relatively easy to replace when the time comes.
Can you mount cantilever brakes onto a road-style bike? Yes, you can. However, you’re going to need to fit in a special fork on your road bike to make that possible.
2. V-Bike Brakes (On MTB, Hybrids, and Touring Bikes)
Traditionally, V-brakes have been pretty popular on off-road bikes, hybrid bikes, and touring bikes. That said, newer bike models are increasingly using disc brakes. But caliper brakes still make for great braking power.
There are few riding conditions where V-style brakes wouldn’t be sufficient. V-brakes are usually found on mountain bikes/off-road bikes because they work reasonably well even in wet and moderately muddy conditions. But cantilevers trump V-brakes when it comes to stopping reliably in extremely mucky conditions.
By the way, V-brakes are heavier than either cantilevers or caliper-type options. Also, you need frame mounts or fork mounts to set them up.
But How Do You Set Up V-brakes?
V-brakes feature two relatively long arms that make decent leverage when nudged by the cables. But before you start the brake installation process, be sure that there’s compatibility with brake levers.
For example, you can use cantilever levers and road levers/drop levers with V-brakes. However, you shouldn’t expect great stopping performance from this kind of pairing. In comparison, SRAM’s V-brakes should give you good performance when coupled with road levers.
Like cantilevers, the majority of V-brakes use cartridge-style pads. That basically means that changing out worn pads is pretty simple and easy. All you need to do is remove the holding bolt or pin, take the worn pad off, and slide in a new pad. Oh, don’t forget to adjust the cable a little if necessary.
Shimano was the first company to call these ones V-brakes. Other cycle companies may call them direct-pull or linear-pull brakes, but they’re essentially the same thing.
Avid also makes good V brakes, so does SRAM. Cyclocross riders like SRAM V-brakes a lot due to their better brake power and compatibility with drop levers.
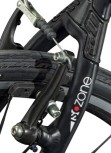
3. Caliper Bike Brakes (Mostly Found on Youth & Road Bikes)

Calipers happen to be the most common bicycle brake type today, especially on road rigs. But it looks like disc brakes are becoming the standard on advanced-rider mountain bikes and road bikes.
Compared to cantilever brakes, caliper brakes offer less stopping power. But caliper options come in a more aerodynamic design, which means they’re lighter.
Caliper brakes feature a strong, simple, sleek, reliable design. A caliper-style option is essentially a rim brake. This kind works by pressing down the bike’s rim, building up sufficient stopping friction.
This is the kind of slowing-down mechanism you’ll see on most youth bikes and the vast majority of road bikes. The option brings to the table dependable and quick braking in various road cycling situations including road bike racing.
Two Types of Caliper Brakes
- Standard/regular calipers
- Direct-mount calipers
Standard Caliper Bicycle Brakes
These ones are available as a single unit and have a single-bolt attachment on the frame or fork. This kind gives you lots of power, but not as much performance as you’d get with direct-mount calipers.
Direct-mount Caliper Brakes
Due to their better braking power, direct-mount caliper brakes are growing in popularity. Instead of one bolt attaching the brake mechanism to your rig, there are two bolts doing the job.
Having two mounting points makes the pads stiffer. And that added stiffness often translates into increased stopping power.
Most calipers open a bit to let you take the wheel off when you need to thanks to a cam-lever. This cam-lever makes wheel removal a bliss even if the tire is a little wider. You need to set the cam-lever back into place once you’re done fixing the tire or fitting in a new one.
So, be sure to check which brake type your fork or frame is designed to work with when buying replacement caliper brakes.
A trend toward disc brakes seems to be picking up pace in the road biking world, though.
4. Disc Bike Brakes (for the Gnarliest Descents)
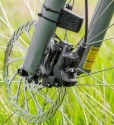
As you might expect, disc bicycle brakes are pretty heavy. In fact, disc brakes are the heaviest of all 4 types. The good thing about them is that they put out greater brake power than V-brakes, plus you don’t need to apply tons of force to actuate them.
One key difference between disc bike brakes and most other types is that they’re not rim-style brakes. Instead of pressing against the rim as do caliper brakes, disc brakes press against a metal rotor. This rotor is usually fixed to the wheel hub.
To use this brake type most effectively, you must make sure that there’s compatibility between the fork/frame, rim, and hub.
The cycling market offers two kinds of disc brakes namely:
- Hydraulic disc brakes
- Mechanical cable-pull disc brakes
Cheap beginner mountain bikes typically use mechanical hydraulic brakes. A regular lever links this option to the brake caliper. These brakes are simpler than their hydraulic counterparts, but they don’t pack as hefty a power punch.
Not surprisingly, mechanical disc brakes are much cheaper than hydraulic braking systems. But you’ll have to keep an eye on them and make brake adjustments to counter cable stretch and brake pad wear.
In hydraulic disc brakes, a lever connects to a caliper or pistons through a hose that contains a hard-to-compress liquid. They’re way more powerful than the mechanical ones. They let you push your riding to the limits…because you can stop anytime.
What Makes Hydraulic Disc Brakes the Holy Grail of Modern Biking?
Do you know why the world and the grandma these days can’t stop praising hydraulic disc bike brakes? It’s because they provide tons of stopping power even when you’re rolling down the gnarliest off-road descents on your downhill bike.
When I say the gnarliest descents, I’m talking breakneck speeds north of 60mph for 30-minute durations. It doesn’t really matter how twisty the trail gets — these brakes got you covered.
One huge pro of disc bicycle brakes is that they cause tire blowouts. That’s because there’s pretty much no heat building up on the rims. These guys live to help you when in the most demanding biking scenarios.
Whether you’re riding through muddy, wet, or debris and dirt-covered trail conditions, these brakes retain their awesome performance. What’s more, the reliability of this not-so-cheap system doesn’t dip even when you right through a deep creek that wets or “muds up” the rotor.
Another reason to choose disc stoppers is that they let you use lighter disc-style rims to save weight. And because the rims see no surface friction, they wear out less quickly — they last longer.
Disc Brakes vs. Regular Brakes
In terms of pad hardness, disc-based options use much harder brakes compared to their non-disc counterparts. But unlike other kinds, these brakes’ pads don’t allow mud, sand, debris, and dust to accumulate on them. As a result, they’re always ready to jump into action whenever prompted to do so, even in high-speed scenarios.
On the whole, disc brakes are heavier, tougher, defy heat better, and tolerate dirt-packed riding situations better than any other kind of bike braking system.
Small wonder many trail bikes, kids’ bikes, hybrid bicycles, cyclocross, DH bikes, gravel bikes, and road bikes are increasingly favoring disc braking.
But there’s one downside — decent disc brakes can cost a pretty penny.
Anatomy of a Bike Brake and How it Works
A bike brake consists of 3 main parts/components. First, there’s a mechanism that enables the rider to apply braking force, usually brake levers or pedals.
Second, there’s a mechanism that relays the braking instructions. This mechanism comprises components including rods, bike chain, hydraulic hoses, and cables.
Third, there’s the brake stopping mechanism itself which could be a drum or a caliper that works by pressing surfaces (2 or more) together.
Pressing these surfaces together serves to convert the kinetic energy from the rider and the bike’s momentum into thermal energy which stops or slows the bike. And this thermal energy eventually gets dissipated.
Understanding the Braking Technique
Braking a bike mainly entails pulling the brake levers on the handlebars. That sets a series of actions in motion to eventually stop the bike. But braking isn’t that simple when it comes to real-world road biking or mountain biking. You want to learn a few critical things about how the braking technique so that you can stay safe when out riding.
What Happens When You Pull the Front Brake
Basically, when you pull the brake levers, some of your weight shifts forward. That forward weight transfer ends up over the front wheel, which adds traction there. If you slam on the brakes too hard, that’s a recipe for OTB/endo. Endo or OTB is cycling speak for when you do something dumb that sends you flying over the handlebars to the waiting hard ground.
What Happens When You Apply the Rear Wheel Brake
And when you apply the rear brakes, a bit of skidding happens, but it’s not always noticeable. If you pull the rear brake levers too much, you’ll have a pronounced rear wheel skid. If the skid is too much and you have the front brakes engaged, you’ll likely OTB.
But this endo thing doesn’t happen in all kinds of cycling situations. For example, it doesn’t happen in bikes with a super-long wheelbase such as tandem bikes and recumbent bikes.
Still, it’s imperative for every cycling enthusiast to master the bike braking technique. Because knowing how to brake correctly can have you crashing less often if not literally saving your life.
7 Tips to Improve Your Bike Braking Technique
- Before embarking on a road trip or trail ride on a new bike or rental bike, be sure to test the brakes. Learn how hard you need to squeeze the brake levers and how responsive the entire braking system is.
- When riding into a berm or leaning into a turn, start braking well before you enter the turn. Related: How to ride a berm.
- When riding on wet pavement, mud, snow, loose gravel/rocks, and other slippery surfaces, slow down and stop using the front brake. Instead, use the rear brake, and don’t pull the lever too hard.
- If the riding surface consists of extremely loose gravel or very loose dirt, it helps to keep the back wheel completely locked out. That’s the best way to slow your bike and maintain control of it.
- If the hill you’re riding is super steep, you’ll likely find that any kind of braking will cause skidding and reduced bike control. So, in this situation, locking out the rear wheel isn’t the best idea. Instead, use the rear brake to slow down the bike, but not too much that the back wheel stops spinning altogether. If the wheel stops rotating, you won’t have much control.
On steep descents, a front-wheel skid would be a hard thing to avoid using the front brake. That’s the quickest path to a crash. Even if you have the safest cycling helmet ever, you’d rather have a safe ride, right? Using the rear brake would cause a rear-wheel skid that wouldn’t cost you too much bike control.
6.What if the descent is pretty long but not necessarily steep? In that case, it’s a good idea to use to keep switching between the front brake and rear brake. That’s the best way to reduce hand fatigue as you roll down a gentle but long slope.
Another reason for alternating the rear and front brake is to prevent the friction areas from overheating. Too much heat can easily cause tire blowouts. Or even cause the fluid that enables hydraulic disc brakes to function properly to boil.
7.If you get a front tire flat, dismount and fix the flat. Whatever you do, don’t use the front brake on the tire because that’s a surefire way to cause the tire to detach from the rim. And that’s one way crashes happen.
Bicycle Brake Levers
These are small metal levers found on the handlebars that enable you to give slow or stop instructions to your braking system. The levers actuate your brakes through compression of the hydraulic brake fluid or pulling the brake cable.
There are 3 main types of bike brake levers namely:
- Standard-pull/short-pull brake levers
- Long-pull levers
- Dual-pull levers
Different factors determine what kind of brakes you should install on your bike. The type of bike you have (road, MTB bike, or BMX bike) and its brake type influences what lever-type you need. The width of the handlebars and who made your groupset (the entire system that makes your bike move) might also determine what lever-type you need.
Standard-pull bike brake levers typically are compatible with cantilever and caliper brakes. This is the kind of brake most road bikes have. Other bikes that may feature short-pull levers are BMX and cyclocross bikes.
Long-pull bike brake levers work best with cable disc brakes and V-brakes. These are the types of levers you typically find on mountain bikes. As for dual-pull bike brake levers, these ones are designed to work best with a gyro or detangler on a BMX bicycle. In other words, dual-pull brakes are typically found on BMX bikes.
Bike Brake Pads

Bicycle brake pads come in different materials and shapes. The vast majority of pads are made of a replaceable rubber pad set in a brake shoe-like mount. A bolt or post attaches the pad to the brake from the back.
However, manufacturers sometimes produce single-piece pads where they mold the pad in to cut costs. But as long as there’s mounting compatibility, a brake can have any one of a number of different kinds of pads.
In terms of shape, most bike brake pads are rectangular with some being curved and longer to work with the rim’s radius.
Larger brake pads tend to wear slower compared to smaller pads with the same thickness. That said, larger pads aren’t always better at providing braking power.
Be Sure to Match Brake Pads to the Right Rim
Brake pads that are too abrasive aren’t a good choice for carbon fiber rims. And, many standard pads don’t work well with ceramic rims. That’s because regular pads build too much heat at the pad-rim contact area.
Using such pads on ceramic bike rims generally lowers the pad’s braking performance in wet weather. You want to match ceramic rims with ceramic brake pads because such pads pack tons of chromium-based compounds that stand up to heat very well.
And when using aluminum rims in wet weather, you want pads designed to perform in such conditions. Good wet-weather pads for aluminum rims are typically made out of iron (iii) oxide as opposed to regular rubber. These iron oxide brake pads provide more friction on wet aluminum rims than do rubber pads. Kool-Stop is known for making these kinds of pads.
Softer vs. harder bike brake pads, what’s better? Softer brake pads offer greater braking power compared to harder brakes. On the other hand, harder brake pads provide less friction, but they last longer than softer brakes. But the best pads offer a decent mix of braking performance and durability.
Bikes Without Brakes: Track, Fixies, and Some BMX Bikes
Some bikes don’t feature brakes. Track bikes, some BMX bikes, and fixed gear bikes are examples of bicycles that don’t have a regular braking system. That said, many fixed bear bikes have a front brake to increase safety or to meet road safety regulations.
Related: Bike Types
With a track bike, braking can cause sudden speed changes, and that’s not something desirable in a velodrome racing situation. BMX bike manufacturers opt not to include brakes as a way to cut costs.
How to Stop on a Trace a Fixie Without Brakes
One way to slow down on a fixed gear bike is to use a hand brake. This is the safest and most reliable way to slow down and stop on a Fixie. If your bike came without a front brake, have your local bike shop add it. Another way to stop on a Fixie without a front brake is to lock out the rear wheel backwards to initiate a skid.
As for stopping on a track bike while racing in a velodrome, stopping is as easy as using a slower cadence. Once you start pedaling slower, your bike will start losing speed, eventually coming to a stop. You can also use the fixed gear bike stopping techniques described above.
How Do You Stop on a BMX Bicycle That Lacks Brakes?
To stop on a BMX bike without brakes, you can put one foot on the rear tire and the saddle. This stopping technique works incredibly fast and effectively. Another stopping strategy on a BMX bike is to lower one foot or both feet on the ground. As you drag the feet on the ground, that creates friction, and friction is strong enough to slow and stop you down.
Summing It Up
While many kinds of bicycle brakes exist, you’ll most likely want to use one of 4 common ones. These include V-brakes, calipers, cantilevers, and disc brakes. Once you pair up the brake you prefer with the right brake levers and bike type, be sure to learn how the braking technique works.
Disc brakes have become what many cycling enthusiasts today and professional cyclists crave. These are superior stopping solutions that demonstrate incredible performance in different use situations. While they’re pricier than every other choice, they’re more effective, versatile, and more durable.